Kinetic photography is a form of mixing art and movement to capture stunning photographs, making for captivating, one-of-a-kind images. Whether an amateur photographer or professional, kinetic techniques let you unleash your creative potential with dynamic results. From blurred scenes to light painting, there are countless ways you can take mesmerizing images using kinetic photography methods that are sure to wow your audience. This post will explore some unique uses for these striking techniques and show how anyone can become an expert at capturing incredible moments with motion.
How to do kinetic photography: a comprehensive guide
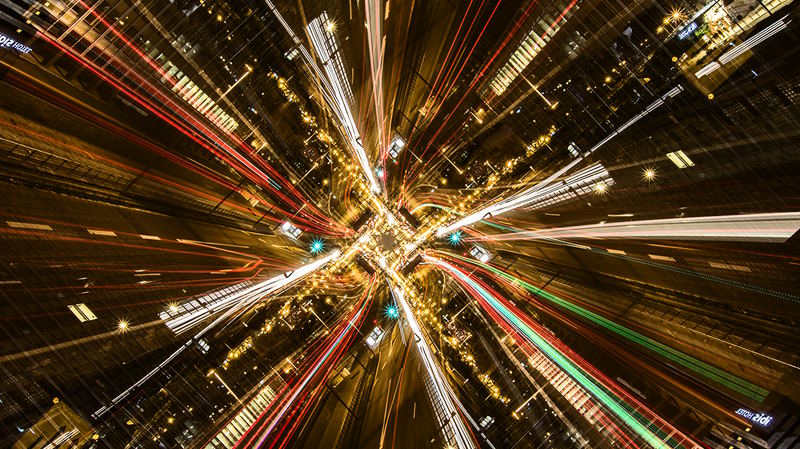
Kinetic photography is a form of art that utilizes movement to create an eye-catching result. It is used in various disciplines such as fashion, product, and landscape photography. To capture dynamic images, you will need specialized equipment like a tripod, shutter release cable or remote trigger, long exposure settings on your camera, and creativity. Here are the steps for creating amazing kinetic photographs:

- Step 1: Choose Your Subject
The subject of your photograph should be something that has movement potential. For example, if you’re shooting a landscape photograph, choose a location with waterfalls or rivers flowing through it. If you’re shooting products, pick items that can be moved easily, such as spinning tops or wind-up toys.
- Step 2: Set Up Your Equipment
Once you have chosen your subject, it’s time to set up the equipment. Make sure your tripod is securely mounted on a flat surface and that all your camera settings are adjusted correctly. This includes setting the shutter speed, aperture, ISO, focus mode, and other manual adjustments. The longer exposure time will be needed for successful kinetic photography shots, so ensure you have enough light available to get the desired results.
- Step 3: Start Shooting
Now that everything is ready, it’s time to start shooting! Begin by taking test shots with different speeds and angles to see how they turn out. You can also experiment with different types of movements, such as back and forth motions or circles. Once you’re happy with the results, it’s time to start shooting for real!
- Step 4: Review Your Results
Once you have finished shooting, review the photographs you took and decide which ones worked best. Then, make any necessary adjustments in editing software like Photoshop or Lightroom before saving your photos. You can also add special effects like motion blur or panning if desired.
Kinetic photography is a great way to capture dynamic images that stand out from the crowd. With some practice and creativity, you will soon be able to create amazing art pieces using this technique. Good luck and happy shooting!
How to camera toss for unique and interesting images
Camera tossing is an experimental photography technique that uses the motion of a tossed camera to create unique and interesting images. To do this, you need a camera with a long exposure setting and a stable tripod or something else to mount it on.
The first step is to set up your shot. Choose a beautiful outdoor location with bright colors, interesting textures, and objects like trees, buildings, or other natural elements for interest. It’s also important to ensure enough ambient light so you can use a low ISO and slow shutter speed without introducing too much noise into the image.
Once your scene is set up, mount the camera onto your tripod or device and adjust the settings as needed. For example, you’ll want to use a slow shutter speed, low ISO setting and turn off any image stabilization settings.
Now it’s time to toss the camera! Here’s where you can really get creative with your photography. Keep the camera in your hand, and as you throw it up in the air, move it around in circles or other patterns while releasing the shutter button on the camera. This will create unique motion blur patterns ranging from subtle light streaks to more abstract shapes depending on how much you spin the camera before letting go.
When shooting with this technique, practice tossing the camera safely so that no one (or anything else) is put at risk. It also helps to have someone else with you to help spot the camera while it’s in mid-air. Finally, remember that this technique requires patience and trial and error, so keep going if your first attempt doesn’t produce amazing results. With some practice, you will soon be able to create stunning images with camera tossing!


